
Tools and Ingredients
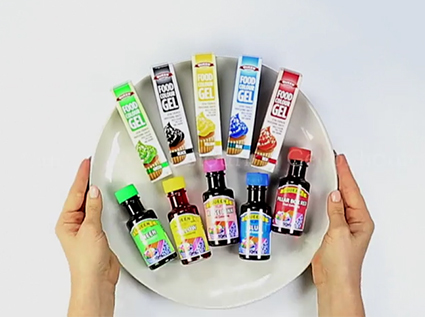
Queen Food Colour Gel or Liquid in three colours
1½ tsp vegetable oil
1 bowl of warm water
1 snap lock bag
290g white chocolate melts
1 bowl for melting chocolate
3 bowls for mixing three colours into chocolate
Metal spoons
Baking tray lined with baking paper
Wooden skewer
Method
STEP 1 – CHOOSE COLOURS
Choose three Queen Food Colours, gel or liquid.
Queen Food Colours Liquids are water based and will cause the chocolate to seize (go crumbly) faster than Queen Food Colour Gels. Too much liquid in chocolate can cause it to seize so we recommend using less than ¼ tsp at a time.
¼ tsp Queen Food Colour Liquid = 10 drops Queen Food Colour Gel
Queen Food Colour Gels are concentrated so you need less to achieve a bold colour, with less risk of seizing the chocolate. We recommend using 2 drops of gel at time.
STEP 2 – WARM COLOURS
Place bottles and/or tubes of food colour into a zip locked bag, removing as much air as possible then sealing.
Submerge the bag in a bowl of warm water for 10 minutes. Remove the bag and shake the bottles to distribute the heat.
Chocolate can also seize if the food colouring is a different temperature to the chocolate so this method ensures the colour is a similar temperature to melted chocolate.
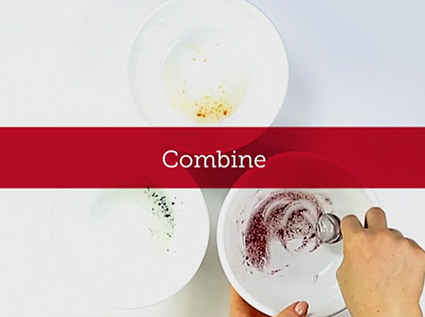
STEP 3 – COMBINE COLOUR AND OIL
Place three dry bowls on the bench and add ½ tsp vegetable oil to each bowl. For food colour gel, add 2 drops of colour to each bowl. For food colour liquid, add less than ¼ tsp to each bowl. Mix to combine oil and food colour.
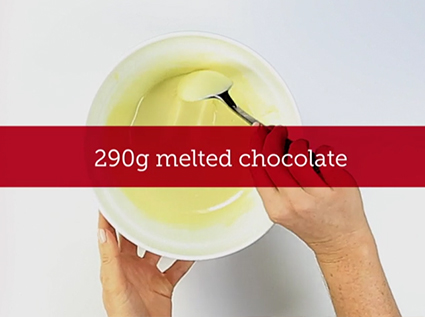
STEP 4 – MELT CHOCOLATE
Place white chocolate melts or chopped white cooking chocolate into a dry microwave-safe glass bowl.
Microwave chocolate in 30 second intervals, stirring in between with a metal spoon until melted. Stirring after short bursts in the microwave will ensure the chocolate does not burn. Always use a metal spoon and never a wooden spoon or rubber spatula – wood or rubber utensils may contain moisture which may make the chocolate seize. If only a few chunks of hard chocolate remain, stir well to use the heat from the existing melted chocolate to melt the last few chunks (and avoid burning if microwaved again).
Use freshly purchased chocolate as the texture and flavour will change in chocolate that’s stored for too long.
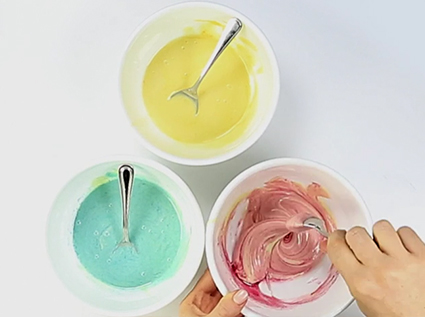
STEP 5 – COLOUR CHOCOLATE
Divide melted chocolate into three bowls prepared with vegetable oil and colour and mix with a metal teaspoon to combine. Add more colour if required but work quickly to avoid seizing. If the chocolate begins to seize (go hard and crumbly) it cannot be re-melted and must be thrown away. Once coloured, move quickly to marble and avoid leaving the chocolate sitting on the bench for too long as it will begin to set.
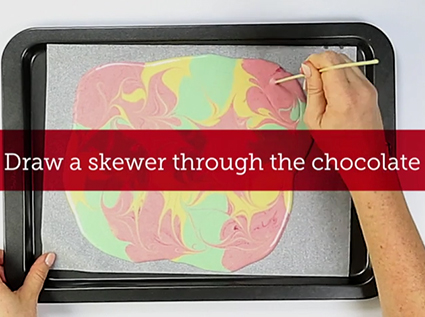
STEP 6 – MARBLE COLOURS
Working quickly, use a metal teaspoon to spoon six dollops of each coloured chocolate onto a baking tray. Lightly shake the tray to smooth the coloured chocolate and bag the tray to burst any air bubbles.
Use a wooden skewer to draw swirls through the chocolate, blending the colours and creating a marble pattern. Work quickly to create the pattern before the chocolate begins to harden. Refrigerate until set.
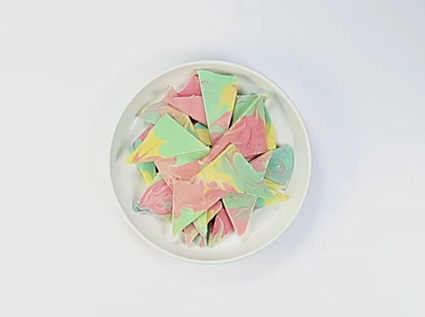
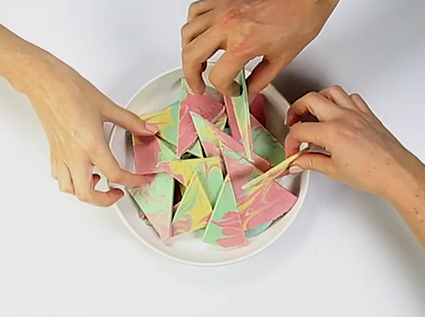
Once set, slice or break the chocolate into shards. Enjoy!


Comments & Reviews
Superb tips very helpful
Ruqaiya
I just noticed the small bottles of colour. Guess these make it easier to control the colours.
Jasmine
Very nice tutorial. Thank you.
I just want to ask about gel colours. Is any kind o gel colour or it is a specific colour with cocoa butter special for chocolate? Thank you again.
Dora
Hi Dora, We unfortunately don’t have chocolate specific colour, however gels will work provided you don’t use too much!
Queen
The gel ruined my white chocolate melts. It’s made the choc not set properly and had cracks all over as I was trying to make thin chocolate pokemon balls. Threw away 3packets worth of white chocolate. I made a batch of blue and a batch red with the melts. Very disappointing for my daughter as we spent hrs preparing. I do not recommend the gel!
Kylie
Hi Kylie,
We’re so sorry to hear of your experience trying to colour white chocolate. While adding too much gel or liquid colour to white chocolate will make it seize and go crumbly (see tip above), the cracks you’ve described have never been encountered in our thorough product testing when we developed our gel food colour range. We generally recommend our colour gels as they contain less water and more pigment, allowing greater colour intensity with less risk of seizing. Our baking team have advised that the cracks may be due to a few things: How long the cooking chocolate has been on shelf, its exposure to sunlight and air as well as any fluctuations in temperature once melted. Hopefully this helps a bit more for next time, but we do find candy melts easier to melt and colour and they’re less sensitive to the elements described above.
Regards, The Queen Team
Queen
Thanks.
Julie