Ingredients
Cake
-
1/2 cup + 2 tsp (65g) unsweetened cocoa powder
-
1 1/3 cup (200g) plain flour
-
1/4 cup (40g) cornflour, triple sifted
-
1/2 tsp salt
-
1 tsp bicarbonate soda
-
1/4 tsp baking powder
-
115g unsalted butter, at room temperature
-
1 1/2 cups (330g) caster sugar
-
2 large eggs, at room temperature
-
1/2 tsp Queen Vanilla Bean paste
-
1/2 cup (125ml) water
-
1/2 cup (125ml) milk
Filling
-
100g butter, softened
-
150g milk chocolate, melted
-
3 cups (450g) icing sugar, sifted
-
1 tbsp milk
-
1 tsp Queen Organic Vanilla Bean Paste
Icing
-
300g butter, softened
-
4 1/2 cups (675g) icing sugar, sifted
-
1 tbsp milk
-
1 tsp Queen Vanilla Bean Paste
-
Queen Blue and Green Food Colours
Speckle Effect
-
3 tsp Queen Organic Vanilla Extract
-
2 tsp cocoa powder
Method - Cake
-
1
Butter and line the base of a two 8” (20cm) round cake tins and preheat oven to 180°C (fan forced). Sift together the cocoa powder, flour, salt, bicarb soda, and baking powder in a bowl.
-
2
Using an electric mixer with a large mixing bowl, beat together the butter and sugar about 5 minutes until smooth and creamy. Add Vanilla and eggs one at a time and beat until fully incorporated.
-
3
Mix together the water and milk. Stir half of the dry ingredients into the butter mixture, then add the milk mixture.Stir in the other half of the dry ingredients until smooth. Split batter mixture between the two prepared tins.
-
4
Bake for about 25 minutes, or until a skewer inserted into the centre of the cake comes out clean. Remove from the oven and cool in tin about 5 mins, then place on a wire rack and cool completely before icing (you can also chill your cakes overnight, this will make them easier to handle and carve).
Method - Filling and Assembly
-
1
Place butter in a large mixing bowl and beat with an electric mixer until light and fluffy.
-
2
With the mixer on low speed, gradually add sifted icing sugar and beat until smooth and pale.
-
3
Add melted chocolate, vanilla, chocolate essence and milk and beat until smooth. (Adjust the amount of milk to make a smooth but not runny consistency)
-
4
Using a long serrated knife, level the top of your cakes so that they have a flat even surface.
-
5
Stack the cakes on top of each other and cut them in two, slightly off centre, about 1.5cm off the centre so that you have two smaller pieces and two larger pieces.
-
6
Using an offset spatula, spread icing on the bottom of one of the larger pieces, then sandwich it with the second larger piece. Stand sandwiched cake on its side in the middle of a cake stand or plate. Spread more icing on the base of the two smaller pieces and place each half on either side of the large pieces, so that the two larger pieces are in the middle and the two smaller pieces are on the outside (see tutorial). If the pieces slide or fall over, then the icing and cake aren’t stiff enough – simply place both in the fridge to allow them to stiffen up a bit before continuing.
-
7
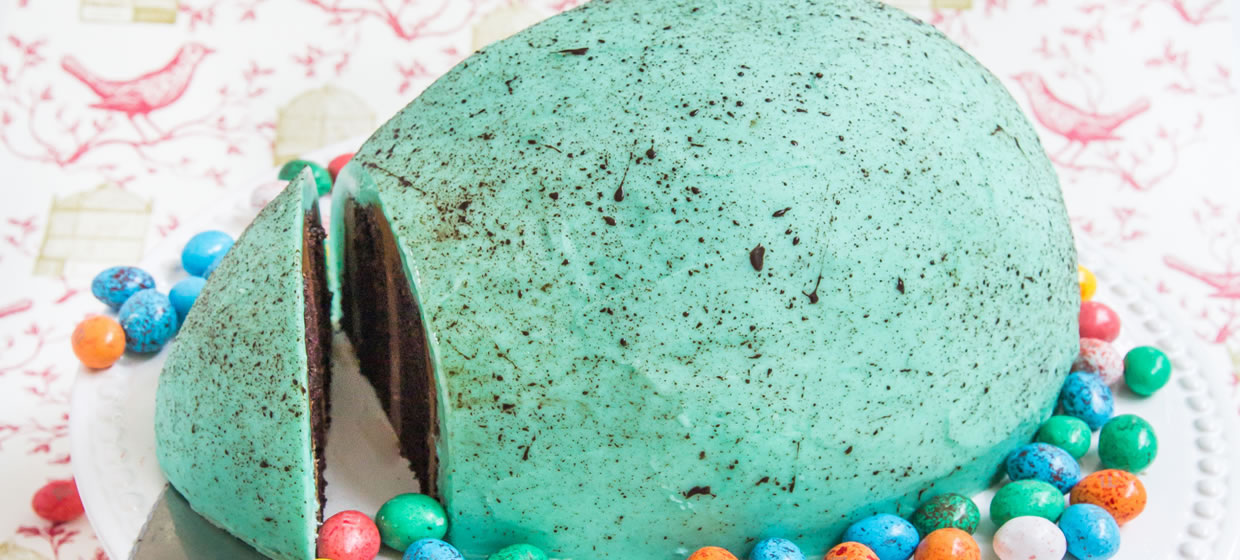
Place cake in the fridge to chill until it hardens up, at least 1 hour, then trim the outer edges to resemble an egg shape (to achieve this shape, cut slightly narrower and lower on one end and wider and higher on the other end of the cake).
-
8
Return assembled cake to the fridge while preparing outer icing.
Method - Finishing and Icing
-
1
Place butter in a large mixing bowl and beat with an electric mixer until light and fluffy. With the mixer on low speed, gradually add sifted icing sugar and vanilla, beat until smooth and pale.
-
2
In a small glass bowl,combine two parts of blue gel colour with one part green colour, mix well. Carefully add mixed colour to icing until desired colour is achieved.
-
3
Use an offset spatula to ‘crumb coat’ the outside of the cake with one layer of icing. Chill for half an hour.
-
4
Cover entire cake with another layer of icing. Use an offset spatula, running it under hot water periodically to achieve a smooth finish for the iced cake. Chill again until ready to speckle.
-
5
Mix vanilla and cocoa powder together in a small bowl. Cover area around cake with lots of baking paper to protect surfaces while speckling cake (they will go everywhere).
-
6
Dip the tip of a stiff bristled paintbrush into the mixture and practice flicking the bristles with your finger tips to create the speckle effect, before moving to the cake. Create speckled effect to desired level – this is the fun part!
-
7
Once complete,chill cake until ready to serve. Remove from fridge 30 minutes before serving to allow cake to soften slightly and allow ease of slicing.
This lovely recipe is originally by Steph from Raspberri Cupcakes. See the original here.


Comments & Reviews